In this guide, I’ll show you how you can make square and vertical videos in iMovie. Square and vertical (also known as portrait or story mode) are popular on social media and for mobile screen viewing. Even YouTube has introduced vertical layouts in YouTube shorts as well as their in-video ads.
- Hack #1: Use iMovie and QuickTime to make vertical videos.
- Hack #2: Use iMovie and Keynote to make square and vertical videos
- Hack #3: Use iMovie and Imvidu to resize videos
- Other tools that will let you make square and vertical videos:
- Crop and resize video in one click with Imvidu. Create more content faster!
Need to resize video quickly? Try Imvidu Studio!
Can you make a square video (or vertical video) in iMovie?
Short answer is No! iMovie lets you create videos in landscape mode only in either one of two aspect ratios only:
- 4:3 landscape
- 16:9 landscape
These videos are suitable for monitors, TVs and projectors.
16:9 is more suitable for wide screen monitors and mobile screens.
Given most multimedia is getting consumed on mobile phones, and with popularity of social media sites introducing video as a preferred type of media, it’s interesting the iMovie doesn’t let you create square or vertical videos.
BUT it doesn’t mean you cannot edit your videos in iMovie. It certainly doesn’t mean you can’t create it on a Mac.
In fact, I’ll show you 3 hacks that you can use right now to start creating square or vertical videos on your Mac or online.
- Hack#1: Use iMovie and QuickTime to make vertical videos
- Hack#2: Use iMovie and Keynote to make square or vertical videos on a Mac
- Hack#3: Use iMovie and Imvidu to make any sized video online
So, let’s get cracking and create some square or vertical videos on your Mac!
Hack #1: Use iMovie and QuickTime to make vertical videos.
With our first hack, you will only be able to make vertical videos but not square videos.
I introduced this method in my other guide that shows you how to resize or crop videos in iMovie. Here we’ll go into the details. As the heading suggests – we’ll be using both iMovie AND QuickTime to get our vertical video.
You may want to do this if you want to resize your video for Instagram, Facebook or TikTok.
Edit and crop your video clip in iMovie
Open your video and select the clip.
Select the ‘Crop’ icon again and select the ‘Crop to Fill’ Option.
Change the frame size to fit around your subject.

Rotate your video using the rotate options. This will:
- Rotate video clip only
- Vertical black bars will show on either side
- The video size (frame) is still in landscape mode.
#2 Save and export your video
That’s okay though. Now apply your settings and save your video file.
#3 Rotate video in QuickTime player
- Open QuickTime
- Select View > Show Clips, then select your video file
- Open the Edit menu, choose to rotate the clip (left or right)
- Click Done.
That’s it. You’ve just used both iMovie and QuickTime to create a vertical (portrait) video.
Hack #2: Use iMovie and Keynote to make square and vertical videos
This method will let you resize your videos in any way you like. Whether that’s landscape, square or video. Learn how to crop video clips in iMovie here.
Once you’ve edited your video in iMovie:
Export (save) it to your files and folders.
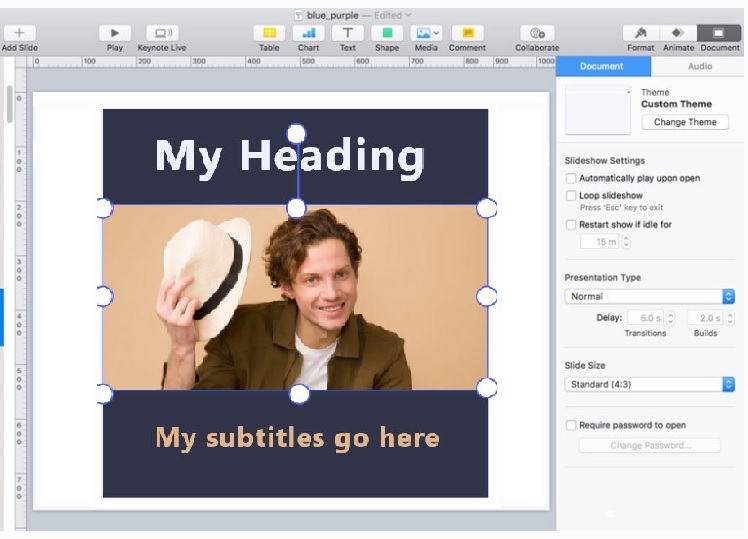
Start a new Keynote.
Click the More button > Document Setup to set up the size of your slide.
This will act as the frame size (or the final size of the video you want to export as).
Tap Slide Size, then tap a new size.

Choose Custom, enter the slide dimensions, then tap Done.
For square videos (and for standard quality for social media) – do 720 x 720.
For vertical videos (portrait mode) – do 1280 x 720.

Click Done to save your changes.
Import your video. You can drag and drop it into the slide. Alternatively:
Open a new slide, select Insert > Choose.
Highlight the file you want and click Insert.
Click and drag the controls around the video (corners) to resize your video within the slide.
Insert a headline above the video clip to let the audience know what your video is about.
Export your slide as a video from Keynote when you’re done!
- Select the File drop down menu.
- Choose Export To.
- Then select QuickTime.
- Adjust the settings to fit your preferences.
- Select Next.
- Save your file.
Hack #3: Use iMovie and Imvidu to resize videos
Okay, so this isn’t really a hack! But it’ll get the job done the way it is supposed to- using the Video Resizer feature in Imvidu Studio which is completely only.
If you’ve already edited your video in iMovie, you’ll need to save it to your files and folders so that you can upload it into Imvidu Studio.
If you haven’t registered, then register for free and sign in to https://studio.imvidu.com. Once you do this:
Upload your video.
Imvidu will convert any speech in your video into text. This will let you:
- Automatically add subtitles to your video also
- Edit your video using text (cut a word to cut your video)
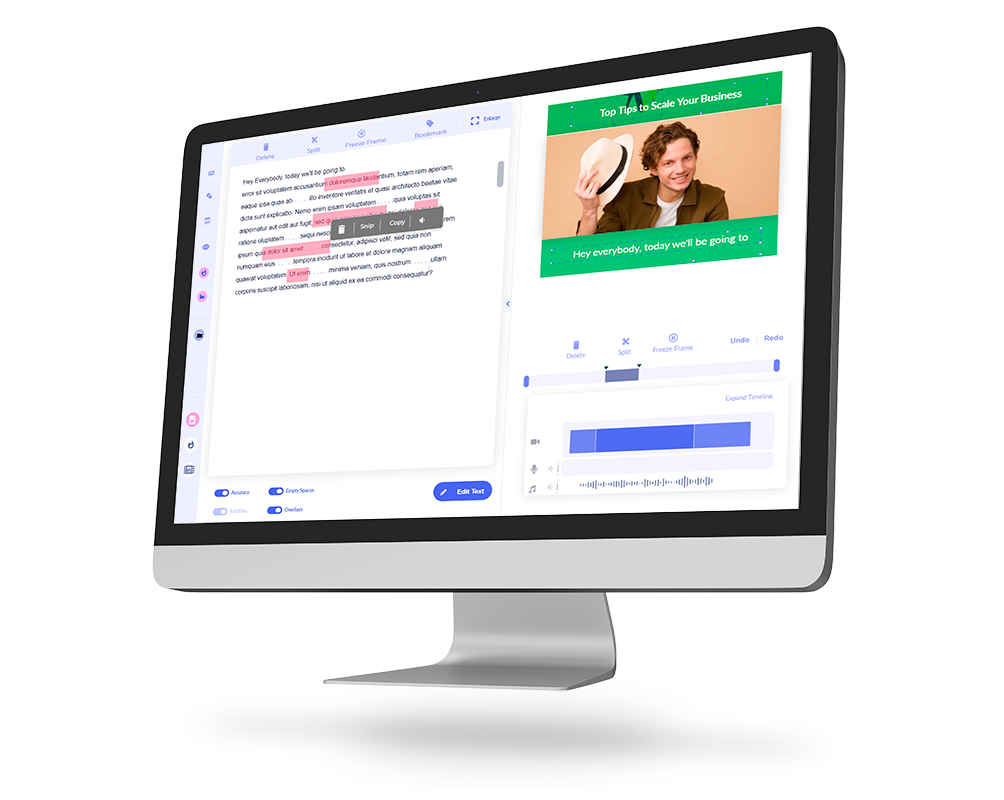
Once the video is uploaded and you’re in the editor:
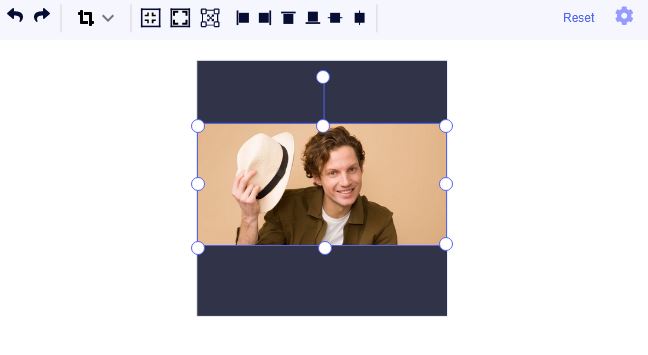
Click on the resize and crop tool (Size in the sidebar)
Select the size you want – for vertical select story mode. In our example we’ll select square.
Either use the transform controls – drag to resize the video inside the frame.
Otherwise you can select a preset to fit our enlarge the video from the style bar.
Optionally, you may want to style your video – at least add subtitles or add text to your video.
When done – click on Export and Download your video.
Read: Most videos on social media are watched on mute! Learn how to add subtitles to videos automatically
Other tools that will let you make square and vertical videos:
- Crop and resize in Imvidu Studio
- Resize in Windows
- Crop videos in Davinci Resolve
- How to crop in Premiere Pro
Crop and resize video in one click with Imvidu. Create more content faster!