In this tutorial I’ll explain how to easily crop a video in iMovie, you’ll also learn how to resize a video as it uses the same features. The best thing about editing your video on iMovie is that it’s free. You can do a lot of editing on the tool you need out of the box on iMovie without needing professional video editing tools.
iMovie does let you resize or crop your video. However, the functionality is unfortunately not advanced!
So, if you’re trying to easily resize or crop videos easily to suit multiple aspect ratios, different devices and frame sizes, or for different purposes on social media, you can try using Imvidu Video Resizer then iMovie doesn’t give you too much to work with.
For example:
- You can create horizontal videos in 4:3 or 16:9 aspect ratios.
- You can create vertical videos (but only using the hack below).
- You cannot crop or resize videos into square videos in iMovie out of the box
Need to crop video quickly? Try Imvidu Studio!
How to crop and resize video clips in iMovie
I’m assuming you’ve already selected your video clips from your library and are ready to edit your project.
So, when you’re in the iMovie app on your Mac and you’re ready to crop your video clip:
Select a clip or photo from the timeline.
The options will be available on the top of the viewer.

Simply select the crop tool as shown in the image below.
There are a few options that will make cropping in iMovie easier.
- Fit
- Crop to fill
- Ken Burns
Select the relevant option as shown below:

Finalize the crop by selecting the apply button.
Read: Crop videos for social media using Imvidu in 3 steps.
Crop Video using Fit Option in iMovie
This option will include the entire image INSIDE the frame. This is useful if you’re rotating the image or video clip around.
Crop to Fill Video Clip in iMovie
An adjustable frame lets you control the crop area. Once you apply the changes, the video clip will crop and the entire viewer should fill with the new cropped video.

What is Ken Burns in iMovie
The Ken Burns effect is a film and video editing technique that creates motion from static images. In iMovie you select two locations in the viewer. iMovie will automatically pan and zoom over the image.
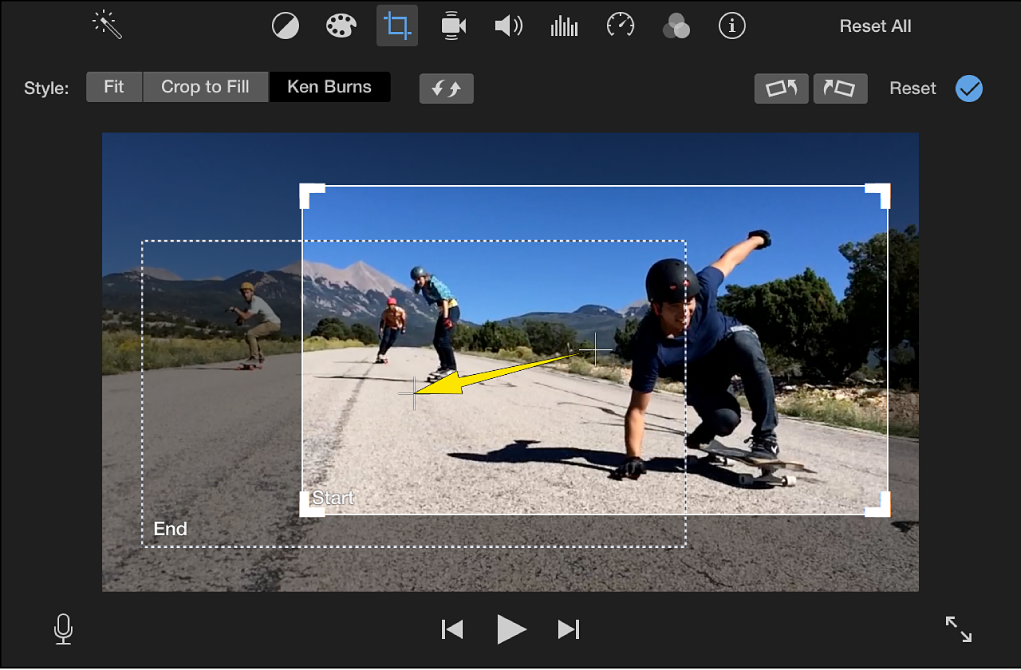
To create the Ken Burns effect in iMovie:
- Set the crop at the start of the clip: Select the Start frame, drag and resize it until the beginning of the clip is framed the way you want.
- Next, set the crop at the end of the clip: Select the End frame and likewise, drag and resize it until the end of the clip is framed the way you want.
Edit videos in a few clicks with Imvidu.
How to make a vertical video in iMovie
iMovie only allows videos in two aspect ratios to be created (16:9 or 4:3). They’re both landscape modes! You can create a vertical or portrait video (note: social media like TikTok and Facebook – they’re called ‘story’ mode). We’ll use both iMovie and QuickTime to help create the vertical mode.
- #1 You will crop your video using the technique above but in a slightly different way
- #2 You will export your cropped video
- #3 You will open the video in QuickTime
- #5 You will rotate your video in to give you a final vertical video.
This is how you make a vertical video in iMovie detail:
#1 Crop Video in iMovie
Open your video and select the clip.
Select the ‘Crop’ icon again and select the ‘Crop to Fill’ Option.
Change the frame size to fit around your subject.

Now rotate your video using the rotate options.
You’ll notice that:
- The video clip is rotated.
- Vertical black bars make up most of the viewer.
- The frame is still in landscape mode. We actually want this for our hack!

#2 Save and export your video
Apply your settings and save your video output.
#3 Open the video in QuickTime player and rotate it
- Select View > Show Clips, then select the clip.
The yellow outline reflects the selected clip. - In the Edit menu, choose to rotate the clip left or right
- Click Done.
Cons of using iMovie to crop your video in vertical mode!
Obviously this method comes with its flaws. Adding text and other elements becomes harder. You need to follow the above method. Re-import your project into iMovie and THEN add the effects and text.
Adding text before you rotate in QuickTime will flip your text around too! You don’t want that!
Crop your videos faster. 100% Online. No Installations.