In this tutorial, I’ll explain how to the L-Cut and the J-Cut in Davinci Resolve. Here is a video tutorial on how to do these cuts, otherwise continue reading below!
How to do a J-Cut in Davinci Resolve?
What is a J-Cut?
You’ve most likely seen the J-Cut without even realizing it. It’s a simple cut that leads into the next scene with the audio.
The J-Cut is a great segway into the next scene that changes locations or shots while letting the audience know what’s about to happen by leading with the audio.

To create an J-cut in Davinci Resolve:
Make sure you are in the Edit tab and you have your video clips in the timeline.
The first thing you need to do is to turn off linked selection in DaVinci Resolve, above the timeline.
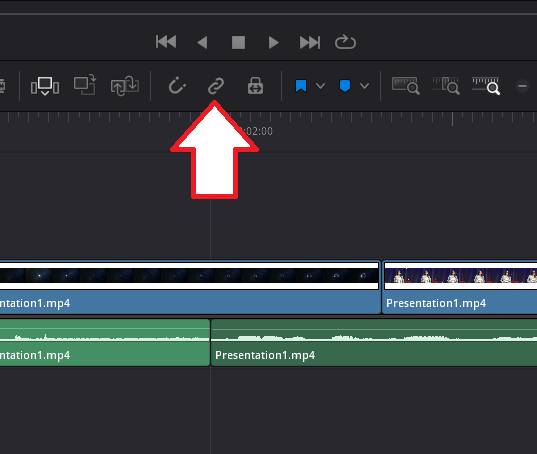
Link selection is by default turned on. When it’s turned on, your video track and audio track are going to move at the same time.
This is ideal when you want to move your clips around the timeline while keeping your audio in sync. However, it may not be ideal depending on the kind of cut that you’re trying to make.
So, now when we turn it off, you will have the ability to move your video track and audio track independently.
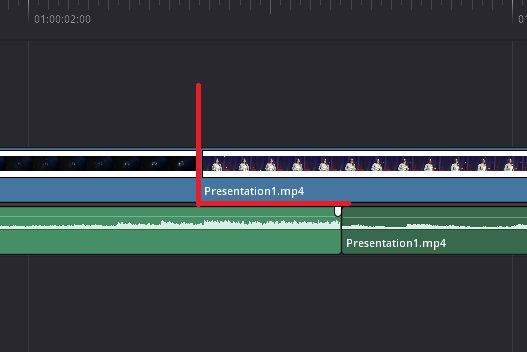
To create a J-Cut, you simply trim the start of your second video clip, then select both the audio and video tracks, and bring it forward, snapping it to your first video clip.
Alternatively, you can simply extend the audio of the second clip over and into your first video.

Also learn:
How to create an L-Cut in Davinci Resolve?
The L cut is similar to the J cut but the audio/video scenario is flipped. Unlike the J-Cut, the L-Cut leads the audio into the next shot scene.
The L cut is almost essential for conversational scenes, interviews and video podcasts where you have multiple speakers. Unlike the J-cut which does a clean cut, this one provides a segway into the next scene or the next speaker (subject).

To do an L-Cut in Resolve:
Once again, make sure the track linking is off.
Now, simply extend the audio of your first video into your second video.
Alternatively, you can bring the second video clip over to the left.
Thirdly, if you don’t want to overwrite any audio, take the audio of your first video on to a different track and extend it over to the second video.
Once you’ve done this, you may turn the links selection back on.
If you’ve done the J-Cut or the L-Cut then turned the links selection back on, then you can keep the cut as is whilst moving the video and the audio tracks anywhere in the timeline.