Don’t just record a zoom meeting, edit it too.
Easily transcribe and edit your zoom recordings.
Zoom is a tech leader that provides an easy and reliable live video cloud platform not only for modern enterprises, but small businesses as well. It served as a medium for video and audio conferencing to make education accessible. Not to mention, people now love to attend online webinars on Zoom, directly from the comfort of their houses.
- Edit Zoom Videos
- Can you record a zoom meeting?
- Why record zoom meeting?
- But what’s the BIG need for recording a zoom meeting?
- How to Record a Zoom Meeting
- How to record Zoom meeting on the Phone?
- How to record a Zoom meeting on a Mac?
- How to record a Zoom meeting on Android?
- How to record Zoom meeting on PC?
- Try Editing Videos Online
- Can you record the meeting if you are not the host?
- How to record a zoom meeting without the permission of the host?
- Zoom Cloud Recording
- How to start a Zoom cloud recording
- Common Questions About Zoom Video Recording
Can you record a zoom meeting?
Given Zoom is primarily used for live video and audio conferencing, you may not know this. But yes, you actually can record a Zoom meeting.
You can record Zoom meetings, Zoom live-streams, Screen share and/or record built in device camera.
You can get a copy of the recording on the cloud (depending on the Zoom plan) or you can save zoom video recordings to your desktop.
Why record zoom meeting?
There are a few reasons why you might want to record a zoom meeting (or a zoom session):
- Record an interview using zoom
- Record an interview for a video podcast and upload to YouTube
- Record lectures
- Make class lessons available for offline viewing
- Record video podcasts
- Create demos and tutorials (as you can share screen)
- Record video presentations for various purposes (from webinars)
- Record Zoom live streams for marketing
- Create video courses
But what’s the BIG need for recording a zoom meeting?
Ever struggled to recall anything in mind after just attending a meeting?
If you answered yes, then that alone would be sufficient reason to record zoom videos! It’s fairly easy to forget what a client, employee, or any other stakeholder mentioned in a meeting. So yes, the Zoom recording option could be a life (or deal saver!).
You can simply keep the meetings, lectures, or webinars recorded in your files or on the cloud for backup. So, next time if you ever fail to remember any important information, you can always play the recording and take notes.
How to Record a Zoom Meeting
You can record a zoom meeting once you have logged into the application. Even if you are using the free version and not the paid one, you will still be able to record zoom meeting on phone, PC, tablet, or any of your preferred devices.
You will be able to locate an option for local recording – that will allow you to zoom record Video as well as the audio of the whole meeting. Afterward, you can save it locally on your device.
However, to enable that specific option, you will have to first log in to your account. Here is how to do it:
Make sure you’ve logged in
- You need access to account settings, which is only possible if you log in to your Zoom web portal as an administrator.
- Once you have done that, move over to the navigation menu where you will see the option “account management” where you will find account settings, click on that.
- You will see a recording tab, locate the “local recording” option there and verify if it is enabled or not.
- If you see it disabled then enable it by clicking the toggle beside it. In case a dialogue box pops up, click on “turn on” to verify if the change has been made or not.
- You must have seen that you can make anyone the host of the meeting, so there’s an option “Hosts can give meeting participants permission to record locally”, by enabling that anyone who would be the host will be able to record the meeting and let’s say the admin sets CR of the class as host, he will be able to record the meeting and then share it with the whole class.
- And if you want to keep this option temporary then you will have to navigate the lock icon and then click on “lock” to confirm the changes.
After that, follow the steps below, depending on the nature of your device and the settings of the meeting.
How to record Zoom meeting on the Phone?
Recording a Zoom meeting on phone is a common question. You can easily record the meeting on your mobile phone: either Android or iOS, by following these steps:
Steps to record a Zoom meeting on iOS and Android
- Launch the Zoom app on your mobile phone
- Click and join the meeting as per standard process OR Create a New meeting
- On the bottom of your screen, a menu will appear.
- Click on “Record the file to the cloud” if you are an iOS user.
- Click on “Record” if you are using Android.
- The meeting will begin to record. You will be able to see a “recording” icon on the top-right corner of your mobile screen.
How to record a Zoom meeting on a Mac?
The layout of Zoom on iOS may differ from the Android users. Therefore, if you are not sure how to record a zoom meeting on iPhone or how to record a zoom meeting on mac, follow these steps:
Steps to record a Zoom meeting on a Mac
- Firstly, tap on the “more” icon at the bottom left corner, a dialogue box will appear at the bottom of the screen with three options. Click the first one “record the meeting to the cloud option”.
- Once you tap the option, the recording will start right away. And you will see the recording sign at the upper right corner, indicating that the recording has started.
- Now, if you want to pause or end the recording, you will tap “more” again. There you will see a pause and stop sign, where there was a “record to the cloud” option before. Tap for the respective actions.
- Once the meeting is ended, the recording will process and save automatically on your account. You can find it under the “my recording” section on your account. You can download it from there to watch it anytime ever again.
How to record a Zoom meeting on Android?
If you are attending the meeting on your android phone, use these steps to record the meeting:
Steps to record a Zoom meeting on Android
- On the app on your phone, you will see the “more” option at the bottom right corner, click that.
- A dialogue box will open, where you will have to navigate the “record” option, it will be at the top. Tap that.
- If you are the admin of the meeting, then the recording will start right away, showing you the recording sign at the upper corner.
- And if you are not the admin or host then they will give you the option “ask permission from host”, by tapping “ok” the message will send to the host, and he can allow you to record the meeting from there.
- If you want to stop or pause the video, you will have to navigate to the “more” option again at the bottom right corner. There you will see the “pause” and “stop” signs to do the respective action.
- And once the meeting has ended, or even if you stopped the recording yourself, it will be saved on your account under the section “my recording”. And you will be able to download or share it from there.
Now, what if you are not using a mobile phone to attend the meeting? How to record zoom meeting on pc? That too is as easy as a pie.
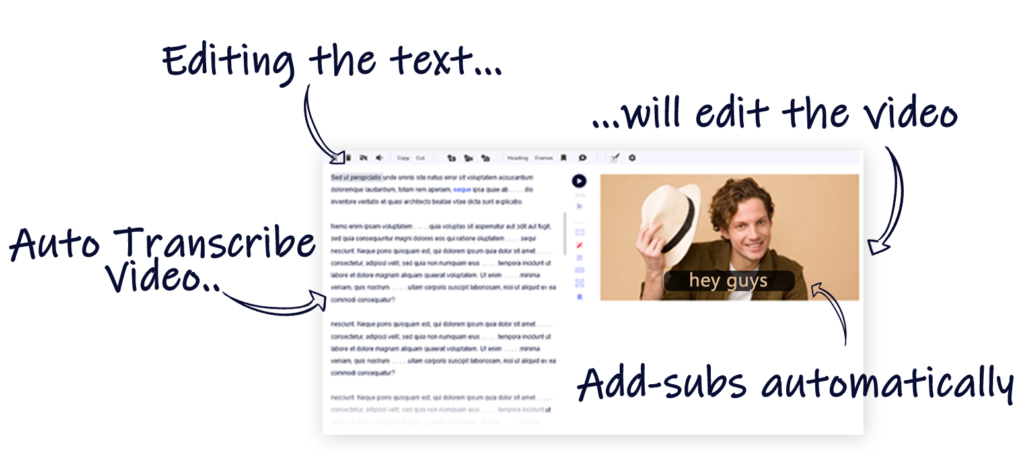
Edit zoom videos. Fast.
Use actual text to edit your videos.
Cut a word? Cut the video!
* Like it or hate it, this call-to-action is a shameless plug of our own tool. Seriously though, you should try it out at least.
How to record Zoom meeting on PC?
The host should record the meeting himself to share it with the participants afterward, or he should allow them to record themselves to keep the recording for future assistance.
- Launch the zoom app on your pc

- If you are a host, tap the record button present below to start recording. If a menu pops up, click on the “record on this computer” option.

- Once the recording will start, the recording sign will appear on the screen of all participants and the host, at the top-left corner. And the sign will stay till the recording is active.
- You can even see if any participant is recording the meeting by clicking on the “participants” option present on the bottom bar of the screen.
- And once the meeting will end, Zoom will process the whole recording and it will be saved automatically. The folder will pop up where the recording will be saved, making it easy for you to navigate it.
The above steps are on how to record zoom meeting as a host.
Edit your zoom recordings. Fast.
Easily transcribe and edit your zoom recordings using text.
Can you record the meeting if you are not the host?
The answer is yes. But you still need the permission of the host.
The default setting of zoom only allows the host to record the meeting. So, if you want to record the meeting, ask for the permission of the host during the meeting.
If anyhow, you do not get the permission of the host, you can always opt for an alternative method.
How to record a zoom meeting without the permission of the host?
Zoom doesn’t allow you to record meetings without the permission of the host. But you can always use some other ways. If the host doesn’t allow you to record the meeting or you don’t want him to know, then you will have to follow the following steps, they are the simplest.
Hack: how to record zoom meetings without permission.
- Download OBS studio or ShareX, there are several screen recording tools that you can use.
- For a Mac: you can use the default built-in screenshot and screen recording tool
- Run the screen recorder first and then join in the meeting through meeting code or link.
- Turn on the full-screen mode and adjust the audio that you want to record.
- Once the meeting is over you can stop the screen recording
- To trim or cut your video you can use the Imvidu Studio (online video editor).
Zoom Cloud Recording
A free account lets you record straight to your device. However a paid Zoom account gives you Cloud Recording. That means you can save your videos on the cloud (making it easier to share and find from anywhere).
Prerequisites for Zoom cloud recording
You need to have the following in order to use cloud recording:
You need to make sure you enable cloud recording, or have one of the following accounts:
- Pro
- Business, or
- Enterprise account
- Licensed user Zoom Desktop Client
Also ensure your device is:
- Windows: 3.5 or higher
- macOS: 3.5 or higher
- Linux: 3.5 or higher
- Zoom Mobile App:
- Android: 3.5 or higher
- iOS: 3.5 or higher
How to start a Zoom cloud recording
Like standard recording only hosts and co-hosts can start a cloud recording. Hosts must make participants a co-host to allow them to record.
Recordings started by co-hosts will still appear in the host’s cloud recordings in their Zoom web portal.
Participants are able to access Zoom cloud recordings through the link that is provided via email after your meeting ends.
To record a meeting to the cloud manually (Note: you can also start your cloud recording automatically every time your meetings start):
- Once your meeting starts
- Click the Record
 button.
 - Select Record to the Cloud to begin recording.
Note: If you are muted, a Recording Alert pop-up window will appear indicating You are muted. - To stop recording, click Pause / Stop Recording or End Meeting.
- Recording must be processed before they can be accessed. You will receive a link to the meeting which can be accessed through the Zoom web portal
- You can manage your cloud recordings through the web portal
Cloud Recording Settings
You can select or (un)select the following cloud recording settings according to what you would like to record in your video. Each selection will be what is recorded.
- Record active speaker with shared screen: Record both the active speaker view and shared content on the same video.
- Record gallery view with shared screen: Record both gallery view and shared content on the same video.
- Record active speaker, gallery view and shared screen separately: Record the active speaker, gallery view and shared screen as separate videos.
- Select Active speaker to record the active speaker only.
- Select Gallery view to record the gallery view only.
- Select Shared screen to record the shared screen only.
- Record an audio only file: Record the audio of the video only. You will receive an M4A file with a recording of the audio.
- Save chat messages from the meeting / webinar: Check this setting to save chat messages from the meeting/webinar. You will receive a TXT file with the transcript of the meeting/webinar chat messages.
Advanced settings for Cloud recording
Zoom allows you to control what and how your record. Here are a few settings that you can control:
- Add a timestamp to the recording: Add a timestamp of the meeting to your cloud recordings. The time will display in the host’s timezone, set on their Zoom profile.
- Display participants’ names in the recording: Add participants’ name to the bottom-right corner of their video.
- Record thumbnails when sharing: Include a thumbnail of the presenter when screen sharing.
- Optimize the recording for 3rd party video editor: Generate your cloud recording video files with a standard format that is compatible with 3rd party video editors. This may increase file size.
- Audio transcript: Check this setting to automatically transcribe your cloud recordings.
- Save panelist chat to the recording: Check this setting to save the messages sent by panelists during a webinar to either all panelists or all panelists and attendees.
Common Questions About Zoom Video Recording
How to record a zoom meeting as a participant?
In order to record a zoom meeting as a participant, you require the permission of the host. The host must make you a co-host . Once you become a co-host, you can:
- Launch Zoom client and click on settings
- Click on the recording tab on the Zoom App
- Click to enable the recording of a separate file for every participant
- Record the meeting and save it to the device afterwards.
What are the prerequisites for recording a meeting on zoom?
In order to be able to record a zoom meeting, you should have:
- Either a basic account (free) on Zoom
- Or a paid Account on Zoom
- On phone, you must have the zoom app installed (android or iOS both have Zoom apps)
Where is my zoom recording on my mac or phone?
Zoom records videos straight to the following directories:
- Windows: C:\Users\[Username]\Documents\Zoom
- Mac: /Users/[Username]/Documents/Zoom
- Linux: home/[Username]/Documents/Zoom
Where did my zoom recording go?
Firstly make sure you are the host. Recordings started by co-hosts will still appear in the host’s recordings in the Zoom web portal. You can recover your recordings if you’ve accidentally deleted it:

If you’re using a Free account, all recordings are saved to your device. Unfortunately, if a system crash has occurred it can be difficult to locate your file as most likely it hasn’t processed.
Where is my Zoom cloud recording?
Zoom cloud recording lets hosts record their video sessions straight to the zoom cloud – without needing to store meetings and videos on their device. This lets hosts access their recordings from where ever or easily share using a URL.
How to edit a zoom recording
You can do a simple trim of your zoom video recording straight in the portal. This let’s you trim the start and stop range. For advance trim you can use the Imvidu online video editor.

Check out this guide to learn how you can trim your videos faster using text!
Download zoom recording
Remember your free plan only saves your zoom recordings to your device. For cloud recordings, you can download them through the web portal.
Once your zoom meeting is over, you will receive an email with a link to your recorded video. This can take a while as the video is processed before it can be accessed. Simply click on the link once you receive it and you will be able to download it from the zoom web portal.
How do I add subtitles to my recorded videos
Zoom provides transcripts of the videos, you can download these from the zoom web portal.
Alternatively, you can edit your video, add/edit subtitles, and spruce up your recordings (especially if using online as presentations, video courses, or video podcasts etc.).
To do this:
Step 1: Login to studio.imvidu.com
Step 2: Upload your zoom recording from your device
Step 3: Click ‘Generate’ Transcript
Step 4: Edit your subtitles text
Once your video is transcribed, it will automatically add the subtitles to your
Step 5: Edit your recorded video
You can also edit (cut/trim) your video and do any other edits that are available quickly.
Step 6: Edit the styling of your subtitles
Step 7: Export your new video or text files
You can now export your video with the subtitles burnt on top of the video so they are permanently placed there. Alternatively you can export your edited text as a text file (perfect for blogs, social media posts) or just the subtitle file (if you’re uploading to other video hosting e.g. YouTube).
Edit zoom videos. Fast.
Use actual text to edit your videos.
Cut a word? Cut the video!
* Like it or hate it, this call-to-action is a shameless plug of our own tool. Seriously though, you should try it out at least.