This article provides comprehensive step-by-step tutorial on how add subtitles to YouTube videos. We go through the various ways you can add subtitles.
Adding subtitles to your videos helps increase your video’s engagement. Why?
- Don’t miss views and subscribers on your video because you forgot to add subtitles! Remember, turning the sound on is not always an option for users.
- Enabling subtitles on YouTube helps people who belong to the deaf community or have age-related hearing loss often find it challenging to watch a video on YouTube without subtitles.
- Apart from that, subtitles or closed captions increase video search-ability and help in improving the video’s SEO ranking.
- 75% of videos on social media are played on mute!
- Create video content faster
- Step 1: Sign into YouTube Studio
- Step 2: Use Subtitles section and select video
- Step 3: Select the subtitle option
- Add and edit subtitles to your videos. Fast.
- That’s all good. But what’s the BIG NEED for adding subtitles to your YouTube Videos?
- Do you get paid for adding subtitles to YouTube videos?
- How long does it take to add subtitles to a YouTube video?
- What is the simplest way to add subtitles?
- Why are my subtitles not working on YouTube?
- How to turn on subtitles for every video?
- Can you hard-code subtitles on the video on YouTube?
How to add subtitles on YouTube?
There are a few ways on how you can add subtitles to a YouTube video quickly. The first one is slightly automated using in-built features within the YouTube studio. The second method is manual, giving you more control.
Finally, there is an alternative, which we’ll go through as well – and something that can be used to boost your content creation!
Step 1: Sign into YouTube Studio
Following is a step-by-step guide on how to add subtitles on YouTube.
- The first step in the process is to “Sign In” your YouTube account.
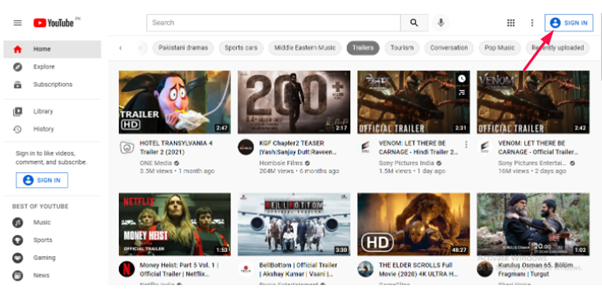
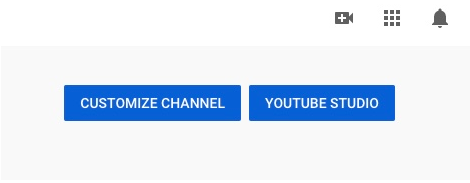
- On the top right corner, click on your account name, and below you will find the option of “YouTube studio.” Click on that.
Step 2: Use Subtitles section and select video
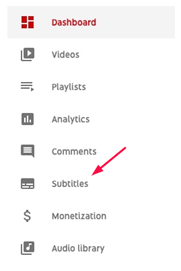
On the left hand side, you should see a menu. Navigate to the item that says ‘subtitles’.
Either upload or locate a video in which you want to add subtitles. Then, click on the ‘Add’ option to open a dialogue for adding a caption.

Step 3: Select the subtitle option
Choose whether to upload any subtitles file or type the subtitles manually. It’s recommended to upload and a SUB or SRT file (with timestamps).
If you manually add subtitles, you will need to match up the start and end times of the text.
Note: It is important to upload subtitles in a supporting format. SRT files are commonly used which includes, you can also use .sub, .sbv, .lrc, or .cap.
Make sure to re-watch the video with subtitles after you’ve added them and make any necessary adjustments to ensure they match up accurately.
There’s an easier way to do subs. Use the Imvidu Subtitle Generator.
How to manually add subtitles on YouTube?
Following are the steps to guide you on how to add subtitles on YouTube manually:
1. To edit your video, go to a video manager and select the video you want to edit.
2. In the toolbar on the top, you will find an option of “Subtitles/CC.”
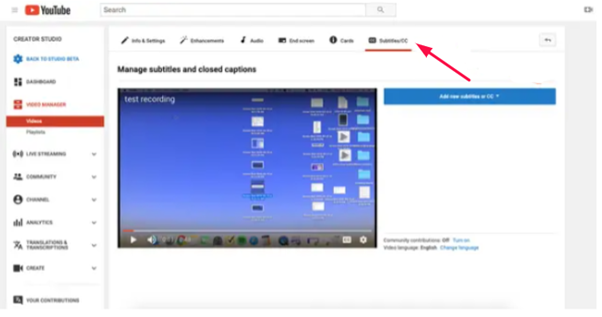
3. The next step is to choose a suitable language for your subtitles and click “set language.”
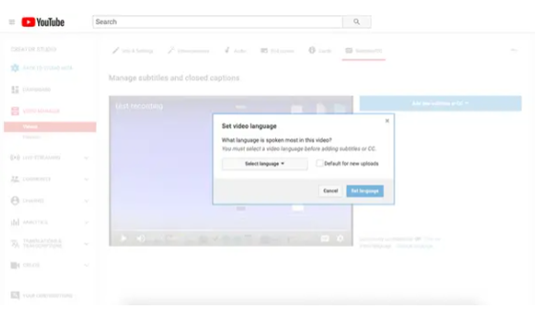
4. Now click on “Add subtitles/CC” and select the language in the drop-down.
5. Click on “Create new subtitles/CC.”
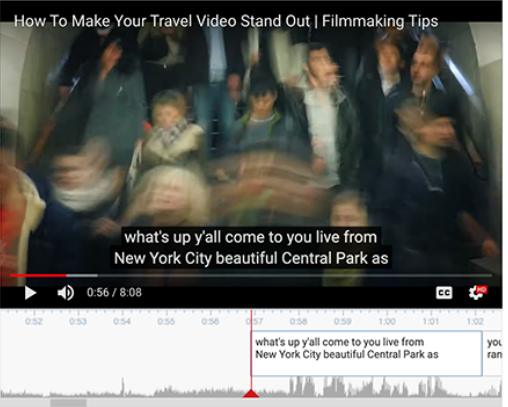
6. The next step is to adjust the video accordingly with subtitles. Play and then pause it wherever you want to add subtitles.
7. On the left of the video, type the subtitles or closed captions into the text box and click the blue “+” button.

8. Under the section below the video, you can also drag the new subtitle or caption to adjust when and how long it will be displayed on the screen.
9. Repeat the process to make sure it is appropriate and when satisfied, click on “Publish” or “Save Changes.”
You can also edit the video using text through an online video editor.
Add and edit subtitles to your videos. Fast.
Simple as editing a word document.
* Like it or hate it, this call-to-action is a shameless plug of our own tool. Seriously though, you should try it out at least.
How to add subtitles on YouTube automatically?
While there are several tools that let you add subtitles on videos automatically, YouTube provides us with an option of auto-generated captions through it’s automatic speech recognition technology.
The quality may differ due to mispronunciation or misrepresentation, but generally speaking does a fairly good job.
Ensure that you are signed in to the YouTube Studio.
- On the left menu click on “Subtitles.”
- Select the video in which subtitles are to be added.
- Below “Subtitles,” choose “more” next to subtitles you want to edit.
- The final step is to review the automatic captions and edit or remove any part that has not been adequately transcribed.
How to use Imvidu to add subtitles to a YouTube Video?
To make the editing process easier by… oh, I dunno… say 10 times, you can use Imvidu to add subtitles to a YouTube video automatically. Here’s how you can do it:
- Drag drop or upload the video on Imvidu
- Next, click on generate transcript
- From there, you can edit your subtitles
- Optionally: you can edit or cut your video as well
- Once done, export the SRT file.
- You can render the video with subtitles styled and permanently overlayed on your video
Pro’s of using the Imvidu online video editor to generate subtitles:
Making subtitles on YouTube
- It can be a tough job to make subtitles on YouTube as it depends on time, money, and accuracy. There are several options we can discuss while making subtitles on YouTube.
- If you have plenty of time on your plate, you can always go for the option of adding subtitles manually. You’ll naturally get higher accuracy when subtitles are typed and adjusted according to the videos manually compared to the auto-generated captions.
- If you have less time, you can quickly go for the option of the auto-generated caption on YouTube, as it can save a lot of your time. Though misrepresentation is expected, you can edit those parts of videos. It is a quick and straightforward way to add subtitles to the required video.
- Lastly, you can always opt to pay to have them written. You can easily find manual transcription service on Fiverr or Upwork if you’re after reasonable rates for subtitle services.
How to edit subtitles on YouTube?
To edit YouTube subtitles, change the text or the timestamps of your subtitles. You can do this in YouTube Studio.
Follow these simple steps:
- First, Sign in to your YouTube Studio
- From the left menu, click on Subtitles
- Choose the video that you want to edit
- Pick the language from which you want to edit, in the Subtitles, click on edit
- Click on Duplicate and edit. Continue to overwrite the edits required
- Click Publish once done.
Alternatively, if you have the SRT file you can edit the file itself in any text editor.
That’s all good. But what’s the BIG NEED for adding subtitles to your YouTube Videos?
- For unusual situations: We often find it interesting to watch our favourite shows or vlogs during a lunch break in the office, school/colleges, or while using public transport.
- Caring for everyone: Another important reason to add subtitles is to show empathy towards the deaf community or hard-of-hearing people. Subtitles can make it easier for them to watch as well as understand the videos or shows.
- Higher ranking in SERPs: Keywords play a crucial role in ranking your articles as well as videos higher. Adding subtitles to your videos can help your video rank high in SEO. This can increase accessibility and engagement, improving the number of views on your videos compared to others.
- Transcripts for more SEO Juice. If you’ve used Imvidu to generate subtitles, then you might as well convert your video into text too and post it as a blog.
Adding Subtitles in various languages
Resources confirm that almost 60 percent of YouTube traffic comes from non-English speakers. It is wise to invest money to translate English subtitles into other languages such as Spanish, Hindi, Arabic, Russian, etc.
This can create more engagement in your videos attracting a global audience. If you’re serving a global audience, then it can be worth having your subtitles manually translated.
Common questions regarding subtitles on YouTube
Do you get paid for adding subtitles to YouTube videos?
You can make money by editing videos for customers and content creators. There are a couple of ways to make money:
- Transcribe videos for customers
- Edit videos for customers
- Create social media content for customers
- Translating videos and subtitles in other languages
How long does it take to add subtitles to a YouTube video?
On average, it can take 5-10 times the video you’re adding a subtitle to. A person who has training in transcription can take about 5-6 hours to add subtitles on a one-hour-long YouTube video. With time and improved skills, one can excel in adding subtitles in a short span of time.
Remember if you’re manually creating subtitles, you may have to repeatedly pause the video, listen to it again… and again.
What is the simplest way to add subtitles?
Auto-generated subtitles are the easiest when it comes to adding subtitles to your videos. YouTube offers the option of auto-generating captions, but they are often mispronounced or misrepresented.
Using something like Imvidu’s Subtitle Generator to add subtitles to your videos automatically can save you a lot of time. Not only this, but you can also style your subtitles for impact and burn on your video so they remain on the video permanently.
Why are my subtitles not working on YouTube?
This query is frequently associated with several bugs on YouTube. To avoid this, you will have to clear your browsing history, cache, and cookies.
Refresh your browser page after this step.
If you are still facing the problem, try running YouTube on another browser. If the captions are still not working, try to disable add-ons and plugins.
Finally, if you’ve uploaded your SRT file, make sure the ‘timing’ is on when you upload it into the creator studio in YouTube.
How to turn on subtitles for every video?
It is a very simple way to enable closed captioning for the videos you watch every day. Following are the steps that you should follow to allow subtitles for all the videos.
1. Click on the Account option in the top right corner.
2. From the menu, Go to “Settings.”
3. The next step is to click on “Playback and performance.”
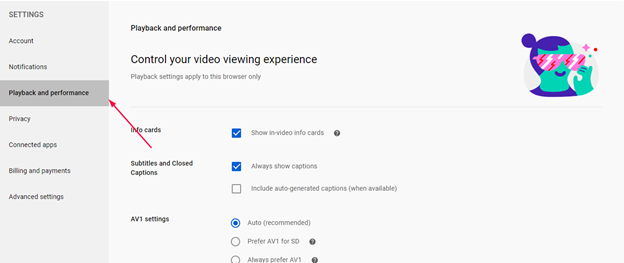
4. After clicking on it, check “Always show captions.”
5. The last step is to click on “Save” so that your settings are changed.
This was the method to always enable captions on your videos.
Can you hard-code subtitles on the video on YouTube?
The best way to hard-code subtitles is to use a video editing software. When you’re hard-coding subtitles you have to ‘burn’ them on top of the video. To make them permanently ‘stick’ on top of the video, you have to render the video.